
shot taken on July 2015 in Lara-Kundu, Antalya, Turkey
shot taken on July 2015 in Lara-Kundu, Antalya, Turkey
Few days ago my 10 years washing machine Beko WM3552M stops to work.
Symptoms: it spins for 1-2 seconds and then nothing happens. The vacuum pump works, the same water heater.
I was checking the PCB , it looks OK. So, I was thinking that probable are the carbon brushes. I’ve changed them and it was working, I was lucky. Because was not easy to identify and to replace the brushes I want to share with you haw to do it.
What you need for this:
First o all you have to cut the power supply, cut water supply too.
Next thing to do is to remove the back cover (there are 5 cross screws), this will give some light inside of the washing machine and also you can easy manipulate the machine for next step.
Put the washing machine on its side , with the soapbox on the bottom, like in picture below.

Put washing machine on its side (soapbox on bottom)
It’s important that the corner with PCB (red dot) to be on upper side; if there is still some water into the machine, at least it will not be drawn on PCB.
Now we have access on the bottom of the washing machine, there is no cover to remove or something like this.
Below is a picture where the motor is visible. In the picture below the brushes have already been removed. But we can see where they are located, and see that any of them is fixed by the motor with 2 screws (again cross screws). One location (upper brush) is very visible, but not the same we can tell about the 2nd one.

Beko washing machine from bottom
For a better visibility I have two other shots from the back of the motor (camera) was in the yellow circle position.

beko washing machine brushes

beko washing machine -brushes location
After you have removed the brushes replace them with the new ones. To be sure that I replace them with the proper brushes I’ve go with the old ones to the store, and clerk provide me exactly what I needed . As you notice in the last picture, it is obvious that the old ones have come to the end of lifetime.

beko washing machine – old brush vs. new brush
When editing documents with Microsoft Word there are two small things that I do all the time:
Here are the tricks how you can do it in Microsoft Word 2010.
Let’s start with the 1st thing: group few lines to stay together on the same page .
So, first select the text that you want to group, then mouse right click and select Paragraph, like in the picture below:
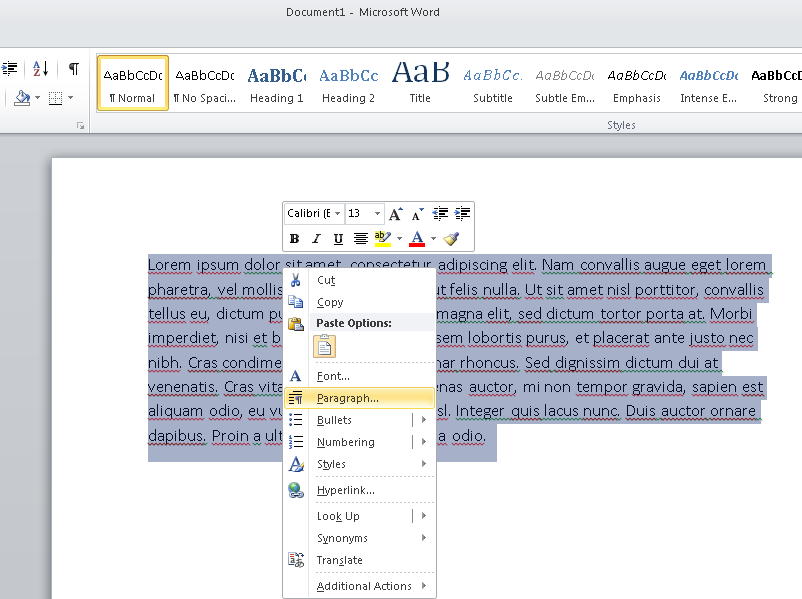
ms word select paragraph
You will see a popup where you can set the paragraph properties, select the Line and Page Breaks tab and check the boxes Window/Orphan control and Keep lines together, just like bellow and press OK button. Now you are sure that the selected block will always stay on the same page.

Now the 2nd thing: group words together, on the same line.
E.g. You will want to do it when you have a formula and you want to me sure that the entire formula will stay on the same line/row.
The solution is next one:
E.g. in the picture below we have a formula in bold, just replace the ALL the spaces in that formula with CTRL+SHIFT+SPACE and new we are safe.
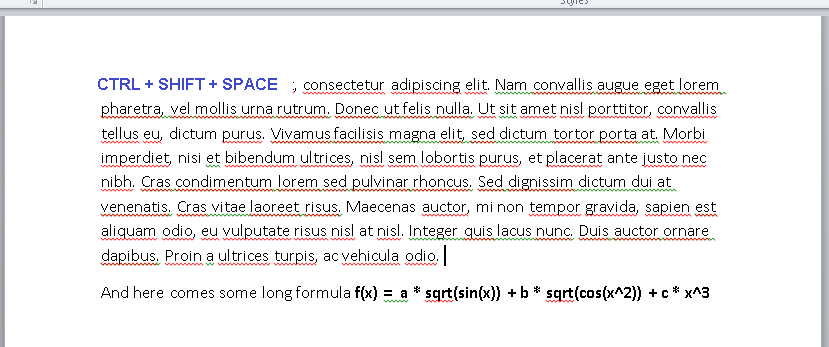
group words together
Eclipse and VIM are my favorite editors. For tasks that requires a lot of coding and especially for java Eclipse is the best, but it requires a lot of resources (CPU and RAM). When I have to modify just couple of lines, then VIM is the choice; I fix the code faster that Eclipse starts.
For both cases there are situations when you would like to see the lines number. Here is how I do it.
In VIM, having the editor open in command mode, just type :set number, or only :set nu.
Here is the result:

vim show lines number
To make the lines number visible in Eclipse, we have to play a little with the menu entries: Window->Preferences, a popup will open and then select in the tree General->>Editors->Text Editors and check the Show line numbers, just like bellow

And the result is something like this:

Eclipse show lines number
Small tip for virtualbox: how you can enable copy (and paste) from host to guest and from guest to host.
Most when playing with virtual machines you would like to copy pieces of code from host machine to guest OS and vice versa.
By default after installing virtual box, this feature is not activated, but can be enabled very easy.
In the main menu of the windows where the guest OS is running is a submenu “Devices”.
Just select Devices -> Sharecropped -> Bidirectional ; like in the picture bellow.

Virtualbox enable shared clipboard
And now the copy -> paste should work without any problem.
E.g. you just found on the net an interesting piece of code browsing from host OS, but net is not enabled on the guest OS; now you can test it just doing copy->paste.
Keep in mind that this setting is for virtual machine. So, if you will play other image of a VM, you have to do the same settings.
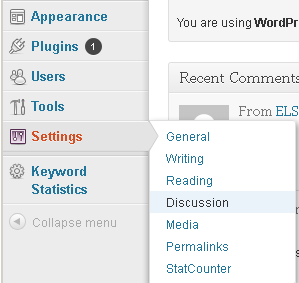
Since few weeks on my WP blog I’m receiving a lot of spam. Some bots are “commenting” on my post doing advertising for things like: xanax, valium, tramadol, diazepam. I already get tens of such comments, so I decided that I have to do something. At the beginning I was looking for some WP plugin to solve the problem. The problem with most of them was that they were too complex (I’m a lazy person), or they just didn’t work. In the end I’ve found that all the WordPress blog has already embedded such a feature. On the WP administration panel there is one option: Settings -> Discussions like bellow.
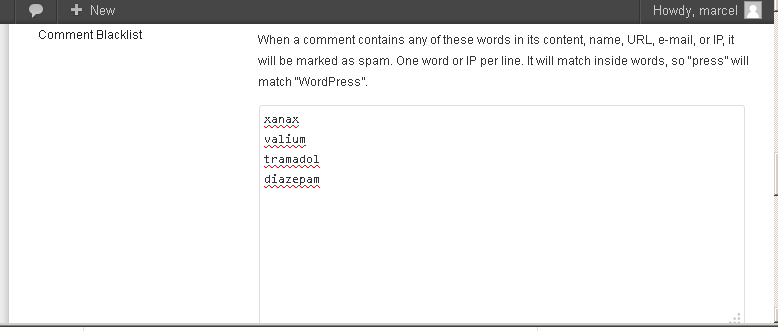
 On the new page just scroll down and look for Comment Blacklist , you will notice a textarea input and here you can insert some keywords (one per line). When someone (person or boot) will add new comments if those keywords are present in the comment, the new comment will automatically be moved to Spam folder. So, I’ve added the keywords: xanax, valium, tramadol, diazepam; see bellow. In just couple of days, 97 comments were catch into the Spam folder :D.
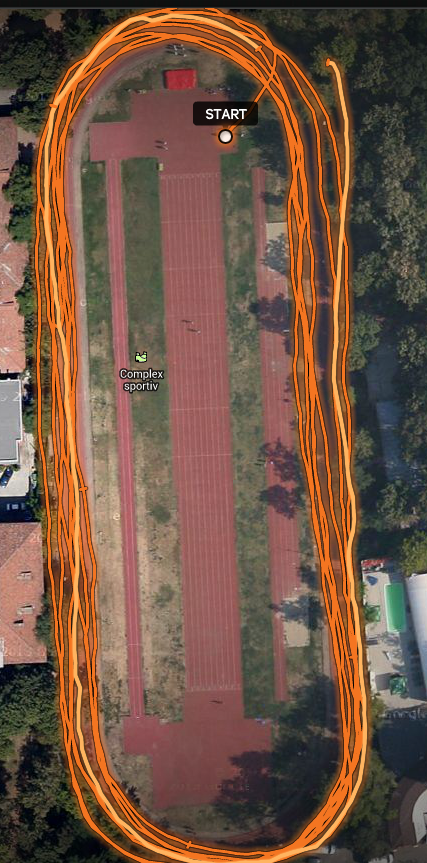
It’s autumn in Romania, rainy days have come. The GPS satellites are hiding behind the clouds, and because of that Sports Tracker (on Android) shows me strange routes, see next picture.
 Today in Bucharest was a very cloudy day, and no chance to see any satellite . I’ve decide to enable the aGPS (assisted GPS) on my phone to see if I get better results. In less than 20 seconds it found my locations, and the differences are more than obvious , much closer to the reality. Broadband data transferred for this run (~20 minutes) was about 0.5 MB (looks like Sports Tracker is downloading also some data from google maps).
For better results you need to have Wi-Fi ON, even if you are not connected to them. aGPS is using the SSID of the routers to “guess” the best coordinates.
On 2nd picture is the route tracked with aGPS ON:
Very often from TCL scripts we may want to execute external commands.
But not always they also available, sometime the command that we want to execute may not exist on the respective machine.
One solution is to put the exec command in a catch { exect $your_command $arg1 $arg2 … } and then to check if it was successfully.
The problem here is that you have to write few lines of code to check if the command is missing, or the arguments passed were wrong.
Other solution, more elegant I think, is to use auto_execok procedure to check if your command really exists, something like bellow:
% set ls_cmd_path [auto_execok ls]
/bin/ls
% puts $ls_cmd_path
/bin/ls
% set ls_cmd_path [auto_execok ls_wrong]
% puts $ls_cmd_path

%
So, just call the set result [auto_execok $your_command] and check if the result is not empty string to see if the command really exists.
Few days ago I’ve installed VirtualBox from Oracle on my windows7 machine because I needed a linux where to play with apache webserver.
The instalation was very easy (I assume that internet is available on the host system :D)
Then I made a login to the guest system and play a little with apache, browsing etc…
My expectation was I’ll be able to browse the guest apache from the host system.
It does not work by default installation :(… so, I had to read some docs 😀 .
The idea is that on default install the VirtualBox will create an network adapter of type NAT (Network Address Translation). This type of adapter will permit to the guest to browse om Internet via host IP; but it does not allow connections to the guest.
Just stop the guest operating system and in VirtualBox Manager go to Settings->Network and change the network adapter from NAT to Bridged Adapter like in next picture.
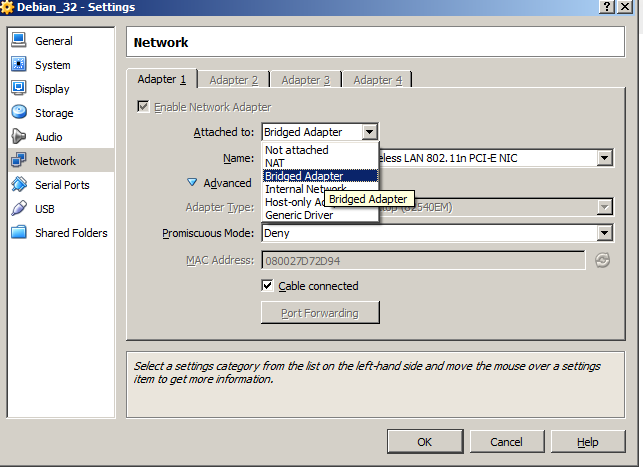
If you have more than one network adapter on your host system, be sure that in the same window you have selected the proper one. See Name: field, in my case the active one was the Wireless LAN the one that has internet access, so I’ve selected that one. Be sure that Cable connected checkbox is on.
No other settings are needed.
Click OK and restart your guest operating system.
If you are in a DHCP network (IPs allocated dynamic) do login on the guest operating system and run the ifconfig command to see what IP was alocated. E.g in my case I got:
>ifconfig

eth0      Link encap:Ethernet  HWaddr 08:00:27:d7:2d:94
          inet addr:192.168.1.105  Bcast:192.168.1.255  Mask:255.255.255.0
          inet6 addr: fe80::a00:27ff:fed7:2d94/64 Scope:Link
          UP BROADCAST RUNNING MULTICAST  MTU:1500  Metric:1
          RX packets:51 errors:0 dropped:0 overruns:0 frame:0
          TX packets:75 errors:0 dropped:0 overruns:0 carrier:0
          collisions:0 txqueuelen:1000
          RX bytes:14365 (14.0 KiB)  TX bytes:10874 (10.6 KiB)

lo        Link encap:Local Loopback
          inet addr:127.0.0.1  Mask:255.0.0.0
          inet6 addr: ::1/128 Scope:Host
          UP LOOPBACK RUNNING  MTU:16436  Metric:1
          RX packets:60 errors:0 dropped:0 overruns:0 frame:0
          TX packets:60 errors:0 dropped:0 overruns:0 carrier:0
          collisions:0 txqueuelen:0
          RX bytes:23077 (22.5 KiB)  TX bytes:23077 (22.5 KiB)
Then I just go to the host system and browse to http://192.168.1.105/ , and all was fine.
If you are not an a DHCP network (ou are using static IPs), you have to set also the IP on the guest system. The same ifconfig command needs to be used, and it will require root permissions.
More info and details about network adapters available on VirtualBox virtualmanchine cahn be found here http://www.virtualbox.org/manual/ch06.html
Have fun!
One of the most difficult task to do in tcsh is to redirect the stdout and stderr into separated files. I’m not doing this very often, and because of this I always forget how to do it. Every time when I need to do such a thing I spend tens of minutes trying different combination and reading man/internet pages.
On other shells like bash it is straight forward: my_command > out.txt 2> err.txt . Such a thing will not work in tcsh, but hey the things are not so complicated. You just have to do (my_command > out.txt ) >& err.txt . Even more, if you want to redirect only the stderr to a file , and want to see what is originally printed on stdout you can do like this: (my_command > /dev/tty ) >& err.txt
Hope that the trick is useful for other visitors who came to this page.