Jan 162019
 

telenet is an useful tool to test the network connection.

E.g. if you want to test is a web server is still online you will want to try something like this

telnet notnull.ro 80

If you are on Windows 10, by default the telnet command is not available, it has to be installed/enabled, you will get a message like

‘telnet’ is not recognized as an internal or external command,
operable program or batch file.

Here are the steps to enable it

  1. Search for Command Prompt and run it as administrator , like in picture below
  2. In command prompt run next command

dism /online /Enable-Feature /FeatureName:TelnetClient

Now the telnet command should work.

 Posted by at 10:44 PM
Feb 242017
 

Allview broken touchscreenFew days one friend just broke his phone touch screen, and the half bottom of the screen  didn’t respond anymore. So, no chance to interact anymore with it.

He wanted to transfer all the files from the phone to the PC, but when the USB data cable is inserted the phone is asking what to do with USB connection:

  • Charge only
  • View photos
  • File copy

He wanted the last option “Files copy” to access the internal storage, but the phone does not respond and starts with default option “Charge Only”. Looks like there is no chance to copy any file.

Fortunately on my PC I have Android Studio installed, and it comes with the “adb” tool (Android Debug Bridge).  It lets you to communicate with the Android devices connected on the PC. Here is what I’ve done to copy the content of entire internal storage to PC.

With bold are the command that I’ve run , and in blue bold are the comments/hints.
First step is to identify the path of the phone storage,
it is different from vendor to vendor and one Android version to other.
C:\Users\mark>adb shell ls -l /
-rw-r--r-- root root 663 1970-01-01 02:00 seapp_contexts
-rw-r--r-- root root 231669 1970-01-01 02:00 sepolicy
drwxrwx--- radio system 1970-01-01 02:00 spdata
drwxr-x--x root sdcard_r 2017-02-24 18:36 storage
dr-xr-xr-x root root 2017-02-24 18:36 sys
drwxr-xr-x root root 1970-01-01 02:00 system
-rw-r--r-- root root 6729 1970-01-01 02:00 ueventd.rc
lrwxrwxrwx root root 2017-02-24 18:36 vendor -> /system/vendor

C:\Users\mark>adb shell ls -l /storage
drwxrwx--x root sdcard_r 1970-01-01 02:00 sdcard0
drwx------ root root 2017-02-24 18:36 sdcard1

C:\Users\mark>adb shell df /storage/*
Filesystem Size Used Free Blksize
/storage/sdcard0 7.2G 4.5G 2.7G 4096
/storage/sdcard1 0.0K 0.0K 0.0K 4096
Based on whet we see above, looks like the storage path is /storage/sdcard0 .
Let's copy it using "adb pull" command.
First the command will build the list of files to be transferred,

then will start transfer and will notify us about the progress status.

C:\Users\mark>adb pull /storage/sdcard0 D:\tmp\bkp_from_allview_internal
[ 24%] /storage/sdcard0/DCIM/Camera/IMG_20141227_141226.jpg: 16%
...
...
/storage/sdcard0/: 1218 files pulled. 0 files skipped. 3.2 MB/s (4717973504 bytes in 1406.642s)

That’s all folk!

 Posted by at 10:07 PM
Sep 252016
 

I’m just putting here this command to remember it next time when I need it.

Problem to be solved

When SD card of my photo camera is full I just upload the photos to my NAS server NSA320 . After that usually I do some cleanup and one of the steps is to move the video (there are not only photos)  files from the the photo/ directory to other location.

Until now I did this step manually, to save time I was thinking to make it automatic.

Solution

This is what I want to do:

  1. Get shell access on my NSA320 , to do this I’ve installed ffp (Fonz fun_plug). It is a collection of packages for NSA320 that includes a ssh server.
  2. After getting ssh access in step 1, I need to create a small scrip to move all the video files from $SOURCE_DIR to $DST_DIR. All video means files with next extensions:
    • .MOV (has to be no case sensitive)
    • .MPG/MP4 (has to be no case sensitive)
    • .AVI (has to be no case sensitive)

I’m using rsync command.

rsync -rav –remove-source-files –exclude ‘*’ –include ‘*/’ –include ‘*.[Mm][Oo][Vv]’ –include ‘*.[Mm][pP][4gG]’ –include ‘*.[Aa][Vv][Ii]’  –prune-empty-dirs $SOURCE_DIR  $DST_DIR

The meaning of the arguments:

  • -r = to go recursively on the entire $SOURCE_DIR
  • -a = archive mode, it means to preserve most of the attributes of the files. For me important was last modified time
  • -v = verbose; I just wanted to have a list with files that have been moved.
  • –remove-source-files = to remove from source dir the files that have been copied to destination.
  • –exclude ‘*’ = by default exclude all files; except the one passed to “–include” switches
  • –include ‘*/’ =  include directories in teh list of files that have to be moved
  • –include ‘*.[Mm][Oo][Vv]’ = include files with .MOV extension; no case sensitive. Similar for .MPG, .MP4, .AVI
  • –prune-empty-dirs = do not copy empty dirs from source to destination

At the end of the command you will noticed something like this:

sent 24287985339 bytes received 8458 bytes 12766356.79 bytes/sec
total size is 24511383985 speedup is 1.01

On my NSA320 it took few minutes to move ~23GB.

 Posted by at 10:18 AM
Jan 192014
 

Eclipse and VIM are my favorite editors. For tasks that requires a lot of coding and especially for java Eclipse is the best, but it requires a lot of resources (CPU and RAM). When I have to modify just couple of lines, then VIM is the choice; I fix the code faster that Eclipse starts.

For both cases there are situations when you would like to see the lines number. Here is how I do it.
In VIM, having the editor open in command mode, just type :set number, or only :set nu.
Here is the result:

vim show lines number

vim show lines number


To revert it (make lines number not visible), just type :set no number, or :set nonu

To make the lines number visible in Eclipse, we have to play a little with the menu entries: Window->Preferences, a popup will open and then select in the tree General->>Editors->Text Editors and check the Show line numbers, just like bellow
eclipse_show_lines_number

And the result is something like this:

Eclipse show lines number

Eclipse show lines number

Jan 182014
 

Small tip for virtualbox: how you can enable copy (and paste) from host to guest and from guest to host.

Most when playing with virtual machines you would like to copy pieces of code from host machine to guest OS and vice versa.

By default after installing virtual box, this feature is not activated, but can be enabled very easy.
In the main menu of the windows where the guest OS is running is a submenu “Devices”.
Just select Devices -> Sharecropped -> Bidirectional ; like  in the picture bellow.

Virtualbox enable shared clipboard

Virtualbox enable shared clipboard

And now the copy -> paste should work without any problem.

E.g. you just found on the net an interesting piece of code browsing from host OS, but net is not enabled on the guest OS; now you can test it just doing copy->paste.

Keep in mind that this setting is for virtual machine. So, if you will play other image of a VM, you have to do the same settings.

 Posted by at 10:17 PM
Aug 232013
 

Very often from TCL scripts we may want to execute external commands.
But not always they also available, sometime the command that we want to execute may not exist on the respective machine.
One solution is to put the exec command in a catch { exect $your_command $arg1 $arg2 … } and then to check if it was successfully.

The problem here is that you have to write few lines of code to check if the command is missing, or the arguments passed were wrong.

Other solution, more elegant I think, is to use auto_execok procedure to check if your command really exists, something like bellow:

% set ls_cmd_path [auto_execok ls]
/bin/ls
% puts $ls_cmd_path
/bin/ls
% set ls_cmd_path [auto_execok ls_wrong]
% puts $ls_cmd_path 

%

So, just call the set result [auto_execok $your_command]  and check if the result is not empty string to see if the command really exists.


Aug 232013
 

Few days ago I’ve installed VirtualBox from Oracle on my windows7 machine because I needed a linux where to play with apache webserver.

The instalation was very easy (I assume that internet is available on the host system :D)

  1. Installed VirtualBox
  2. Created a guest machine for Debian
  3. Downloaded Debian Netinstall Image; it is a small CD image which allow ou to install Debian via network. Just google for debian netinst iso , and you should get the latest version.
  4. Tell to VirtualBox to boot first from the downloaded iso file, and “start” the guest machine.
  5. Machine boots and next steps are straightforward: select language, partition disk, select and install packages
  6. The guest machine will then download the needed packages from the internet and will be installed.

Then I made a login to the guest system and play a little with apache, browsing etc…

My expectation was I’ll be able to browse the guest apache from the host system.

It does not work by default installation :(… so, I had to read some docs 😀 .

The idea is that on default install the VirtualBox will create an network adapter of type NAT (Network Address Translation). This type of adapter will permit to the guest to browse om Internet via host IP; but it does not allow connections to the guest.

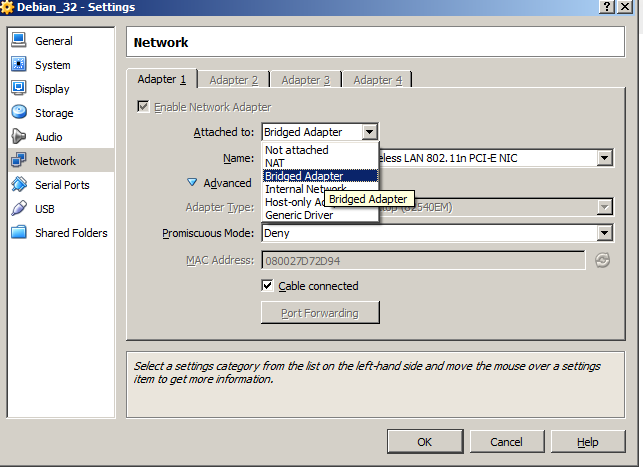
Just stop the guest operating system and in VirtualBox Manager go to Settings->Network and change the network adapter from NAT to Bridged Adapter like in next picture.

network_select_bridged

If you have more than one network adapter on your host system, be sure that in the same window you have selected the proper one. See Name: field, in my case the active one was the Wireless LAN the one that has internet access, so I’ve selected that one. Be sure that Cable connected checkbox is on.

No other settings are needed.

Click OK and restart your guest operating system.

If you are in a DHCP network (IPs allocated dynamic) do login on the guest operating system and run the ifconfig  command to see what IP was alocated. E.g in my case I got:

>ifconfig

eth0      Link encap:Ethernet  HWaddr 08:00:27:d7:2d:94  
          inet addr:192.168.1.105  Bcast:192.168.1.255  Mask:255.255.255.0
          inet6 addr: fe80::a00:27ff:fed7:2d94/64 Scope:Link
          UP BROADCAST RUNNING MULTICAST  MTU:1500  Metric:1
          RX packets:51 errors:0 dropped:0 overruns:0 frame:0
          TX packets:75 errors:0 dropped:0 overruns:0 carrier:0
          collisions:0 txqueuelen:1000 
          RX bytes:14365 (14.0 KiB)  TX bytes:10874 (10.6 KiB)

lo        Link encap:Local Loopback  
          inet addr:127.0.0.1  Mask:255.0.0.0
          inet6 addr: ::1/128 Scope:Host
          UP LOOPBACK RUNNING  MTU:16436  Metric:1
          RX packets:60 errors:0 dropped:0 overruns:0 frame:0
          TX packets:60 errors:0 dropped:0 overruns:0 carrier:0
          collisions:0 txqueuelen:0 
          RX bytes:23077 (22.5 KiB)  TX bytes:23077 (22.5 KiB)

Then I just go to the host system and browse to http://192.168.1.105/ , and all was fine.

If you are not an a DHCP network (ou are using static IPs), you have to set also the IP on the guest system. The same ifconfig command needs to be used, and it will require root permissions.

More info and details about network adapters available on VirtualBox virtualmanchine cahn be found here http://www.virtualbox.org/manual/ch06.html

Have fun!

Aug 202013
 

One of the most difficult task to do in tcsh is to  redirect the stdout and stderr into separated files. I’m not doing this very often, and because of this I always forget how to do it. Every time when I need to do such a thing I spend tens of minutes trying different combination and reading man/internet pages.

On other shells like bash it is straight forward: my_command > out.txt 2> err.txt  . Such a thing will not work in tcsh, but hey the things are not so complicated. You just have to do (my_command > out.txt ) >& err.txt . Even more, if you want to redirect only the stderr to a file , and want to see what is originally printed on stdout you can do like this: (my_command > /dev/tty ) >& err.txt

Hope that the trick is useful for other visitors who came to this page.

Jun 032013
 

Since year 2000 I’m a big fun of vim editor, in that period I’ve switched from joe editor to the more powerful vim.

In that period I have used it mostly for PHP programming.
What was not quite OK was the fact that I did not have a PHP help “integrated” into my editor.
What I knew is that the documentation of C/C++ was easy accessible within vim.
In vim when editing C/C++ code just go the the name of a function/structure and press K (SHIFT + k) and magically you will notice the documentation of that word coming up.
The background of this behaviour: when “K” is pressed the vim editor will run the command “man $word” and the output of this command is shown in your editor ($word is the word where the cursor is placed)
The good thing is that the “K” bind key is configurable, all that we have to do is to run set keywordprg=/path/to/my_script in vim (or put it in vim.rc file for needed extensions) and when the “K” key will be press then the vim will run “/path/to/my_script $word”.

The next good thing is that on PHP site if you need the documentation for a function or for a statement is enough to put in your browser an URL like http://www.php.net/$a_word (e.g. http://www.php.net/foreach http://www.php.net/printf ), and php.net will give you the documentation page.

So, for PHP extension I’ve run set keywordprg=/home/mark/my_php_doc and inside /home/mark/my_php_doc I have next couple of lines:

#!/usr/bin/bash
elinks http://www.php.net/$1

It will launch the elinks browser using URL http://www.php.net/$1
Now I have an online PHP help available, always up to date 😉 .

A lot of other things can be done here…
If there is not internet available (hard to believe it nowdays) instead of visiting http://www.php.net/site you can build your own script which will grep some local files and eventually will print the piece of file that you need to stdout (it will be redirected to your editor).
You can also extend the documentation with the function/classes from your own libraries, or for other languages than PHP you can search in the specific directories/files .

This is an old vim tip that I’m using since years, but few days ago talking with some other experienced vim users I’ve noticed that they were not aware of this feature of vim.
So, I felt the need to share it with other people.

Sep 082012
 

Few time ago I had a tcl chalange that in other languages is straight forward: split a string using as separator a substring.
In tcl there is a split function: [split $myStr $subStr] but, by default it splits by any char of $subStr.
To be more precise let’s assume that we have a string $my_str like

"set1 line1
set1 line 2
set 1 line 3

set2 line 1
set2 line 2

set3 line1
set3 line2
set3 line3"

and we want to split by empty line (“\n\n”).

If we try soemething like
set list_str [split $my_str "\n\n"]
the $list_str is
{set1 line1 } {set1 line 2} {set 1 line 3} {} {set2 line 1} {set2 line 2} {} {set3 line1} {set3 line2} {set3 line3}
it is the same thing as set list_str [split $my_str "\n"] .

The trick is to replace the “\n\n” sequence in $my_str with one single char , a char which does not exists in $my_str, and the to split the result by this single char.
And one char which probable does not exists in $my_str is something like “\x00”.

So, a line like
set list_str [split [string map [list "\n\n" "\x00"] $my_str] "\x00"]
is exactly what you need